AWS Credentials
This guide provides a step-by-step process to create an IAM user in AWS and attach a policy to it fulfilling Axebows requirements.
1. Creating an IAM User
To create an IAM user, follow these instructions:
1.1. Step 1: Access the AWS Console
-
Open the AWS Management Console: https://console.aws.amazon.com/iam/
-
This will give you access to the IAM dashboard where you can manage users, roles, and policies.
1.2. Step 2: Navigate to the Users Section
-
In the left navigation pane, select Users.
-
This section allows you to view, create, or manage existing IAM users.

1.3. Step 3: Create a New User
-
Click on Create user.
-
This initiates the process to set up a new IAM user in your account.

1.4. Step 4: Set Up User Details
-
Enter the user name and click Next.
-
The user name should be descriptive for easy identification.

1.5. Step 5: Attach a Policy to the User
-
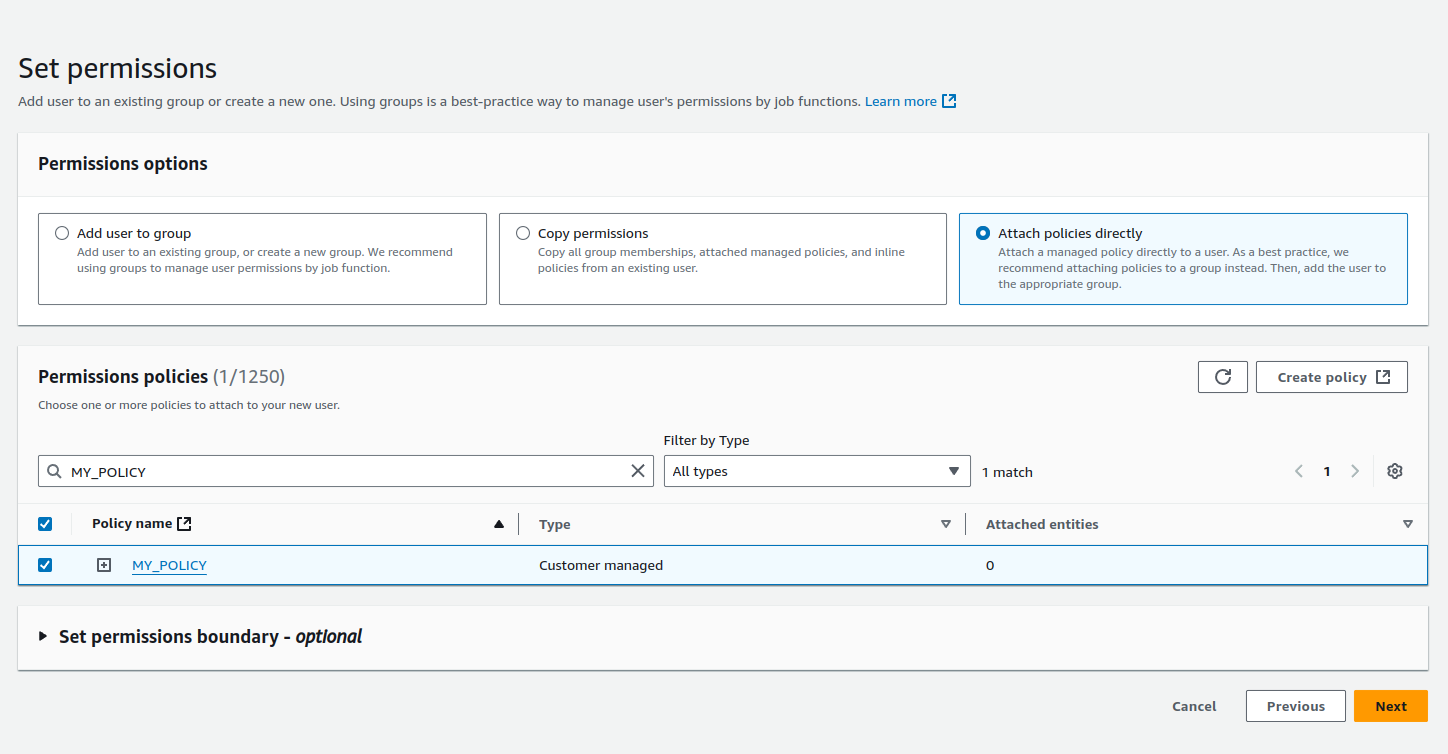
Select Attach policies directly to grant permissions to the new user.
-
Click on Create policy if you need to define a custom policy.

1.6. Step 6: Create a Custom Policy
Axebow requires an IAM user to manage the infrastructure on your AWS account securely. By creating this user with a minimal set of permissions, you ensure that Axebow can manage resources without having access to other parts of your account.
The custom policy you will create contains only the minimal credentials necessary for Axebow to perform infrastructure management tasks. This approach ensures that Axebow can access and control only what is needed, without compromising other resources.
-
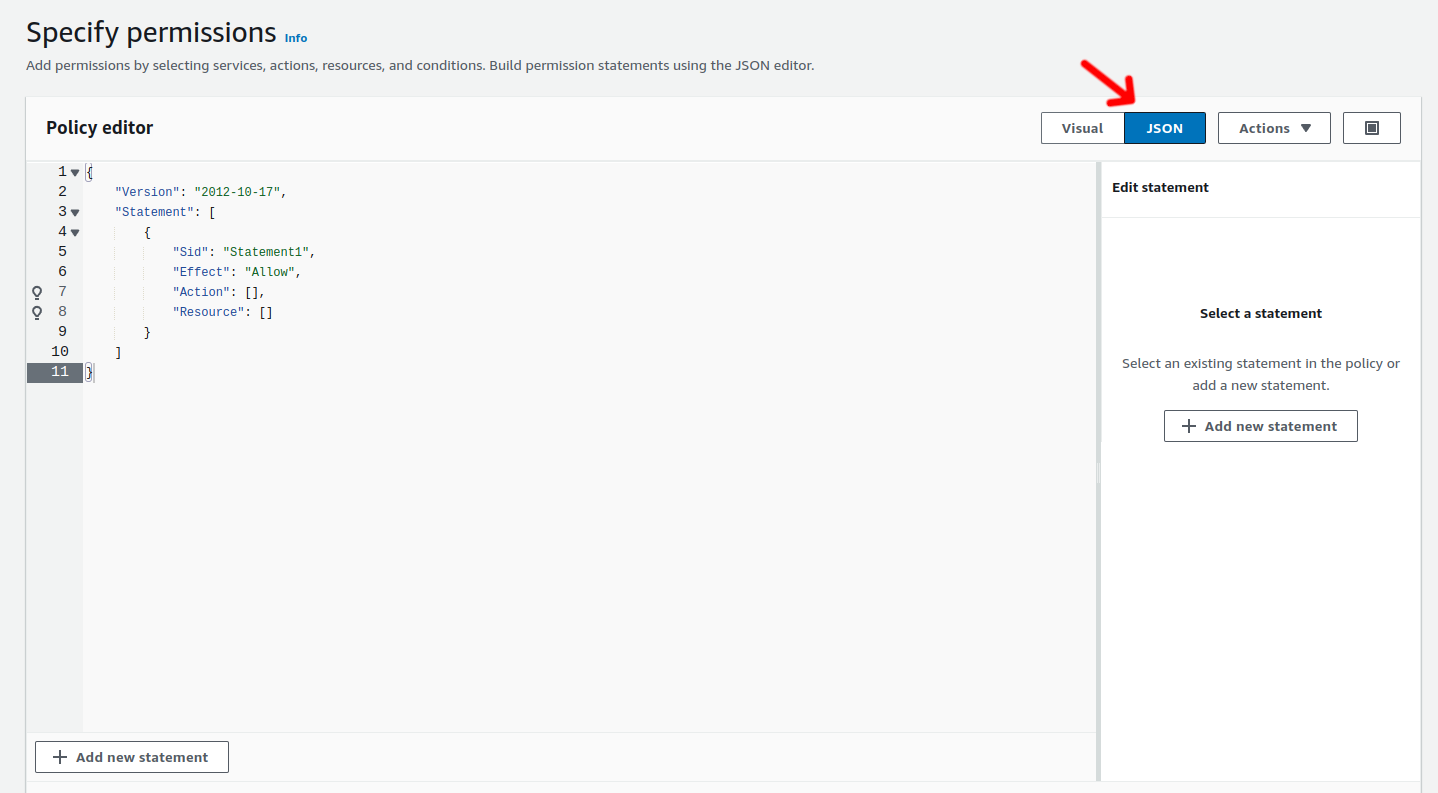
Choose the JSON tab.
-
Copy and paste the content below, with the permissions required by Axebow.
-
This policy defines limited permissions, ensuring that Axebow can access only the required resources for infrastructure management.
-
Click Create policy to complete the process.

1.6.1. Axebow permissions
{
  "Version": "2012-10-17",
  "Statement": [
    {
      "Effect": "Allow",
      "Action": [
        "ec2:DescribeIpamPools",
        "ec2:AllocateIpamPoolCidr",
        "ec2:AttachNetworkInterface",
        "ec2:DetachNetworkInterface",
        "ec2:AllocateAddress",
        "ec2:AssignIpv6Addresses",
        "ec2:AssignPrivateIpAddresses",
        "ec2:UnassignPrivateIpAddresses",
        "ec2:AssociateRouteTable",
        "ec2:AssociateVpcCidrBlock",
        "ec2:AttachInternetGateway",
        "ec2:AuthorizeSecurityGroupIngress",
        "ec2:CreateCarrierGateway",
        "ec2:CreateInternetGateway",
        "ec2:CreateEgressOnlyInternetGateway",
        "ec2:CreateNatGateway",
        "ec2:CreateNetworkInterface",
        "ec2:CreateRoute",
        "ec2:CreateRouteTable",
        "ec2:CreateSecurityGroup",
        "ec2:CreateSubnet",
        "ec2:CreateTags",
        "ec2:CreateVpc",
        "ec2:CreateVpcEndpoint",
        "ec2:DisassociateVpcCidrBlock",
        "ec2:ModifyVpcAttribute",
        "ec2:ModifyVpcEndpoint",
        "ec2:DeleteCarrierGateway",
        "ec2:DeleteInternetGateway",
        "ec2:DeleteEgressOnlyInternetGateway",
        "ec2:DeleteNatGateway",
        "ec2:DeleteRouteTable",
        "ec2:ReplaceRoute",
        "ec2:DeleteSecurityGroup",
        "ec2:DeleteSubnet",
        "ec2:DeleteTags",
        "ec2:DeleteVpc",
        "ec2:DeleteVpcEndpoints",
        "ec2:DescribeAccountAttributes",
        "ec2:DescribeAddresses",
        "ec2:DescribeAvailabilityZones",
        "ec2:DescribeCarrierGateways",
        "ec2:DescribeInstances",
        "ec2:DescribeInstanceTypes",
        "ec2:DescribeInternetGateways",
        "ec2:DescribeEgressOnlyInternetGateways",
        "ec2:DescribeInstanceTypes",
        "ec2:DescribeImages",
        "ec2:DescribeNatGateways",
        "ec2:DescribeNetworkInterfaces",
        "ec2:DescribeNetworkInterfaceAttribute",
        "ec2:DescribeRouteTables",
        "ec2:DescribeSecurityGroups",
        "ec2:DescribeSubnets",
        "ec2:DescribeVpcs",
        "ec2:DescribeDhcpOptions",
        "ec2:DescribeVpcAttribute",
        "ec2:DescribeVpcEndpoints",
        "ec2:DescribeVolumes",
        "ec2:DescribeTags",
        "ec2:DetachInternetGateway",
        "ec2:DisassociateRouteTable",
        "ec2:DisassociateAddress",
        "ec2:ModifyInstanceAttribute",
        "ec2:ModifyNetworkInterfaceAttribute",
        "ec2:ModifySubnetAttribute",
        "ec2:ReleaseAddress",
        "ec2:RevokeSecurityGroupIngress",
        "ec2:RunInstances",
        "ec2:TerminateInstances",
        "tag:GetResources",
        "elasticloadbalancing:AddTags",
        "elasticloadbalancing:CreateLoadBalancer",
        "elasticloadbalancing:ConfigureHealthCheck",
        "elasticloadbalancing:DeleteLoadBalancer",
        "elasticloadbalancing:DeleteTargetGroup",
        "elasticloadbalancing:DescribeLoadBalancers",
        "elasticloadbalancing:DescribeLoadBalancerAttributes",
        "elasticloadbalancing:DescribeTargetGroups",
        "elasticloadbalancing:ApplySecurityGroupsToLoadBalancer",
        "elasticloadbalancing:SetSecurityGroups",
        "elasticloadbalancing:DescribeTags",
        "elasticloadbalancing:ModifyLoadBalancerAttributes",
        "elasticloadbalancing:RegisterInstancesWithLoadBalancer",
        "elasticloadbalancing:DeregisterInstancesFromLoadBalancer",
        "elasticloadbalancing:RemoveTags",
        "elasticloadbalancing:SetSubnets",
        "elasticloadbalancing:ModifyTargetGroupAttributes",
        "elasticloadbalancing:CreateTargetGroup",
        "elasticloadbalancing:DescribeListeners",
        "elasticloadbalancing:CreateListener",
        "elasticloadbalancing:DescribeTargetHealth",
        "elasticloadbalancing:RegisterTargets",
        "elasticloadbalancing:DeleteListener",
        "autoscaling:DescribeAutoScalingGroups",
        "autoscaling:DescribeInstanceRefreshes",
        "ec2:CreateLaunchTemplate",
        "ec2:CreateLaunchTemplateVersion",
        "ec2:DescribeLaunchTemplates",
        "ec2:DescribeLaunchTemplateVersions",
        "ec2:DeleteLaunchTemplate",
        "ec2:DeleteLaunchTemplateVersions",
        "ec2:DescribeKeyPairs",
        "ec2:ModifyInstanceMetadataOptions"
      ],
      "Resource": [
        "*"
      ]
    },
    {
      "Effect": "Allow",
      "Action": [
        "autoscaling:CreateAutoScalingGroup",
        "autoscaling:UpdateAutoScalingGroup",
        "autoscaling:CreateOrUpdateTags",
        "autoscaling:StartInstanceRefresh",
        "autoscaling:DeleteAutoScalingGroup",
        "autoscaling:DeleteTags"
      ],
      "Resource": [
        "arn:*:autoscaling:*:*:autoScalingGroup:*:autoScalingGroupName/*"
      ]
    },
    {
      "Effect": "Allow",
      "Action": [
        "iam:CreateServiceLinkedRole"
      ],
      "Resource": [
        "arn:*:iam::*:role/aws-service-role/autoscaling.amazonaws.com/AWSServiceRoleForAutoScaling"
      ],
      "Condition": {
        "StringLike": {
          "iam:AWSServiceName": "autoscaling.amazonaws.com"
        }
      }
    },
    {
      "Effect": "Allow",
      "Action": [
        "iam:CreateServiceLinkedRole"
      ],
      "Resource": [
        "arn:*:iam::*:role/aws-service-role/elasticloadbalancing.amazonaws.com/AWSServiceRoleForElasticLoadBalancing"
      ],
      "Condition": {
        "StringLike": {
          "iam:AWSServiceName": "elasticloadbalancing.amazonaws.com"
        }
      }
    },
    {
      "Effect": "Allow",
      "Action": [
        "iam:CreateServiceLinkedRole"
      ],
      "Resource": [
        "arn:*:iam::*:role/aws-service-role/spot.amazonaws.com/AWSServiceRoleForEC2Spot"
      ],
      "Condition": {
        "StringLike": {
          "iam:AWSServiceName": "spot.amazonaws.com"
        }
      }
    },
    {
      "Effect": "Allow",
      "Action": [
        "iam:PassRole"
      ],
      "Resource": [
        "arn:*:iam::*:role/*.cluster-api-provider-aws.sigs.k8s.io"
      ]
    },
    {
      "Effect": "Allow",
      "Action": [
        "secretsmanager:CreateSecret",
        "secretsmanager:DeleteSecret",
        "secretsmanager:TagResource"
      ],
      "Resource": [
        "arn:*:secretsmanager:*:*:secret:aws.cluster.x-k8s.io/*"
      ]
    }
  ]
}
2. Creating Credentials for the User
To generate access credentials for the newly created user, follow these steps:
2.1. Step 1: Access Security Credentials
-
Select the user you just created.
-
Navigate to the Security credentials tab.
-
Click on Create access key to generate programmatic access credentials.

2.2. Step 2: Choose Access Key Options
-
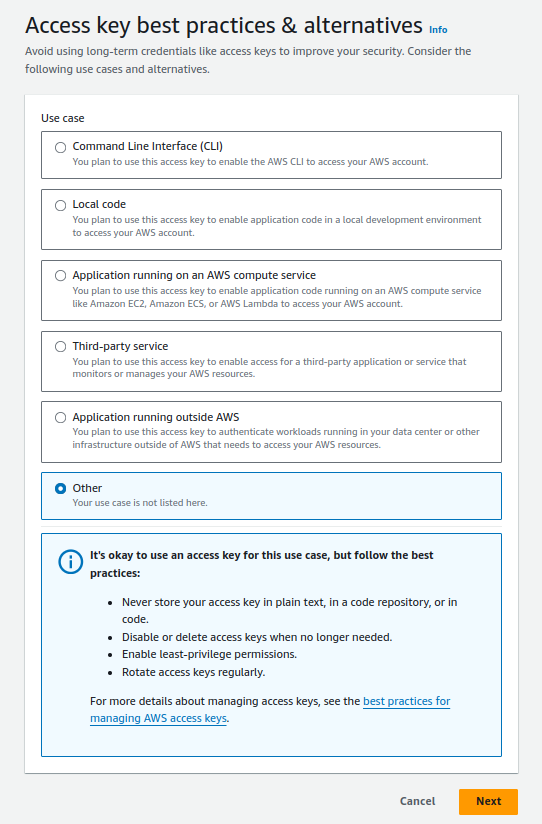
Select Other as the type of access and click Next.
-
This option is typically used for programmatic access rather than specific AWS services.

3. Using credentials in an Axebow account
Before allowing Axebow to manage the infrastructure in your AWS account, a certain number of prerequisites must be satisfied.
Axebow uses ClusterAPI (https://cluster-api.sigs.k8s.io) to manage the infrastructure, and AWS provides ships with clusterawsadm, a utility to help you manage IAM objects for it.
3.1. Installation
Download the clusterawsadm binary from the AWS provider releases, and make it executable
curl -L -sS https://github.com/kubernetes-sigs/cluster-api-provider-aws/releases/download/v2.6.1/clusterawsadm-linux-amd64 -o clusterawsadm
chmod +x clusterawsadm
3.2. Usage
In order to use clusterawsadm you must have an administrative user in an AWS account. Once you have that administrator user you need to set your environment variables before use clusterawsadm:
-
AWS_REGION
-
AWS_ACCESS_KEY_ID
-
AWS_SECRET_ACCESS_KEY
Then, use clusterawsadm utility to create a ClourFormation stack in your AWS account with the correct IAM resources required by Axebow:
export AWS_REGION=<your-region>
export AWS_ACCESS_KEY_ID=<your-access-key>
export AWS_SECRET_ACCESS_KEY=<your-secret-access-key>

clusterawsadm bootstrap iam create-cloudformation-stack
Now, when creating a new Axebow account, provide your credentials <your-access-key> and <your-secret-access-key>.

